Posts

Sewing DIY 3D Face Mask & Mask Pouch and Pattern

Image
Luckily we don't need to wear face masks most time in around Brisbane Queensland Australia.  Of course, we had a few times we must. When local government decided lock down to prevent from Covid risk, and one or two weeks after lock down to clear of, and we must wear masks. If you not and caught there would be fines. And thanks to local people, I think they followed government decisions so well for public health. I've been using 3 ply disposable face masks, and been thinking to make some fabric masks my own, which would be good for environment as I can wash them after using for reuse. Although filter needs to be disposed after a use.  Hope we have days months years without mask soon.  Be careful not to fix elastics with stitches because the knot of elastics will be put in the hole where folded for elastics, and the knots not to be shown. In my instance, I cut the elastics to10" (25cm) long, and tried the mask on before making a knot, and cut off extra elastics after a kno...

Sewing DIY Tote bag from Dress.

Image
I made a tote bag from the dress that I don't wear any more.   Polka dots on fabric and white caller made a cute bag :)  Because dress zip was a good condition, I separated the zip from dress before cutting the dress.   Because there was not inner layer dress, the dress itself fabric was so thin,  inner fabric needed to make the bag  For how to make, tutorial, please click the Video below, hope you enjoy. If the Video was helpful, please thumbs up and subscribe my Youtube channel:  Mikinoos DIY Thank you.

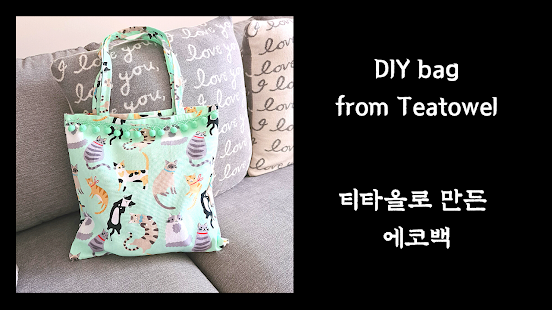
Sewing DIY Bag from Tea Towel

Image
My friend who loves cats asked me to make the bag from towel. Since she a cat as pet, she loves cats designed products such as tea towels, fabrics, cups, stickers, etc. She mentioned that I don't want to use this super cute tea towel as tea towel when she handed the cats designed towel to me.  Designed cats are in one direction, the direction needs to be considered, so if the bag made with fold in half in the middle of towel, one side the cats would have the right direction, but the other side the cat would be upside down direction.  For how to make, tutorial, please click the Video below, hope you enjoy. If the Video was helpful, please thumbs up and subscribe my Youtube channel:  Mikinoos DIY Thank you.

Linen bag alteration

Image
The linen bag bought for $2 when you buy clothes. I bought it because the puppy pic on linen bag is super cute. But I could not use it because of the name of clothing shop, 'ally'. The shop name is on the right bottom corner and the big bit shop name on the back of bag. The puppy is super cute, and linen fabric is good quality.   So I hid the shop names with other puppies/dog printed fabric. On the front of the bag, the name is hidden by printed puppies of other fabric, and I sew a button on puppy's bow tie. On the back of the bag, I attach a big and deep enough pocket to hide the shop name.  I was very happy how the bag altered. No more shop names show, and even the bag looks better with a bit of color added. And also better for use with the deep and big pocket. For tutorial, please click the Video below, hope you enjoy. If the Video is helpful, please subscribe my Youtube channel:  Mikinoos DIY Thank you. 

Sewing DIY Cat Dress and Pattern

Image
Last week I made a apron with lovely bees on yellow fabric and duck family's swimming designed fabric, which I loved so much. And I decided to make to my dear cat a dress with the same fabrics used in Apron. And also similar design as my apron. Apparently, my cat dress is tiny compare to mine, so adorable. 😊   Measurements For how to make, tutorial, please click the Video below, hope you enjoy. If the Video was helpful, please thumbs up and subscribe my Youtube channel:  Mikinoos DIY Thank you.

sewing DIY apron and pattern

Image
Warm spring spring spring, feel like spring again when I made the apron above because of color combinations with bees on yellows fabric, and duck family out and enjoy swimming designed on fabric.  I would be so dreadful event when the completed sewing works turned out weird from fabric color match, even though I spent so much time to select right fabric among the fabrics I already have. A few months ago I made a apron, it did not need any color combination as I chose one fabric to be it, which was easy. Anyway I like so much how the turned out this time with lovely colors.   ​ Measurement above For how to make, tutorial, please click the Video below, hope you enjoy. If the Video was helpful, please thumbs up and subscribe my Youtube channel:  Mikinoos DIY Thank you. My dear cat Popsie is a good companion when I sew, Popsie gives me a break as well from sewing. And I enjoy so much when my cat comes and checks me out, or distracts me from sewing to get my attention. I shoul...

DIY Cat Harness & Leash Set and Pattern

Image
I have made an harness jacket for my cat. I let him play without any lease or harness on back garden, but if we need to play at front garden, or go to camping, some harnesses and leash set needed.  Harness jacket vest area finished with hook and loop tape which is adjustable to cat's vest size, so it will fit on him even though he put on weights. I thought to use hook and loop tape for neck of harness jacket but it might make neck strap too thick and uncomfortable for cat to move his head. So I ended up using slide plastic buckle. Because I made harness jacket with cute cat designed cotton fabric, my cat can wear as jacket as well without a leash. Preparation: Cotton fabric for inner, outer, and buckle straps, batting, 10mm buckle clip, 10m triglide adjustable buckle 1, D ring 1, snap hook 1, poly strap 2m Strap measurement for buckles - width 4 times of the buckle glide hole size, and length 4.25 inches for the short one and 7.75 inches for the long one. Strap material : as per...

DIY Reversible Tissue Box Cover

Image
 I think tissue box covers give a bit of coziness and softness to house atmosphere. Making tissue box covers were in my sewing list for a long time. Finally I made one, and thought why didn't I make it earlier. I think that this cover will be in use until I make another one. If I have a few more covers I can change covers in every season like you change your doona covers.  Measurements: I thought I needed to measure only top, and one side for four, but there are 2 short width sides, and 2 wider sides. Needed to measure top, one short and wider sides, and add seam allowance 0.25inch (0.5cm), no need to measure bottom side. Because it's reversible, cut 2 different fabrics for top, 2 short sides, and 2 wider sides, and interfacing 1 each. Interfacing is not essential. For how to make, tutorial, please click the Video below, hope you enjoy. If the Video was helpful, please thumbs up and subscribe my Youtube channel:  Mikinoos DIY Thank you.