Posts

Showing posts from 2023

Refashion two gingham mini dresses to a midi dress & shirt

Image
My friend and I have both have the same dress,  after we worn the dress enough, We wanted to refashion them and feel new clothes again. For how to make, tutorial, please click the Video below, hope you enjoy. If the Video was helpful, please thumbs up  and subscribe my Youtube channel:  Mikinoos DIY Thank you. Step by Step Using seam ripper, cut seam between shirt and 1st tier skirt of one of dress. Trim the bottom end of shirt to make neater and then hem. Hemming: fold 0.25" and fold 0.25" the bottom end of shirt, and sew. Because the shirt is not long enough, hemming as little as possilbe would be good.                        Easy done for shirt πŸ‘• Cut inner fabric attached to two tiered skirt, and trim the top end of skirt. The trim top of skirt will be sewn with the bottom end of minidress. Another mini dress: cut skirt hem and save it for midi dress waist belt string. Compare the length of the top end of two tired skirt and the bottom end of another mini dress, and the l

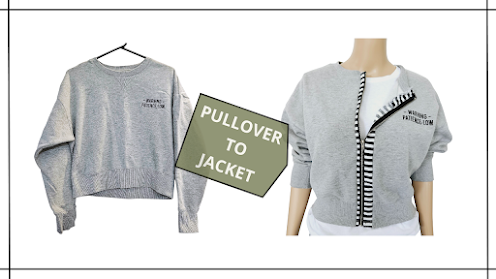
Sewing DIY - Grey Pullover to Jacket (Wardrobe refashion)

Image
It is an easy pullover alteration. I worn this fleece sweatshirt a few times  and the fabric of this shirt condition was good. A little bit of changes to this shirt would give me some interests   keep wearing next a couple of years more. For how to make, tutorial, please click the Video below, hope you enjoy. If the Video was helpful, please thumbs up  and subscribe my Youtube channel:  Mikinoos DIY Thank you. Step by Step I cut a zipper with some fabric attached about 2-3cm away from zipper. I re-used the zipper from one of my top which I did not wear for a long time.  The zipper with fabic cut is uneven, in this instance, because I wanted to save zipper from the top before bin it, so I cut rughly on fabric around zipper. When i save the zipper I did not think of this would be used like this. And a few days later, when I decided to alter my pullover to jacket, I thought this zipper with fabrci would be good use for that alteration, and rather than using zipper itself only, I decided u

Sewing DIY reversible wide brim hat (Free Pattern)

Image
Pattern :   you can download from the my Youtube video's description. For how to make, tutorial, please click the Video below, hope you enjoy. If the Video was helpful, please thumbs up  and subscribe my Youtube channel:  Mikinoos DIY Thank you. Step by Step Step 1 - Refer the hyperlinked pattern on Mikinoos Youtube video. Cut out 1 top crown, 2 side crowns, 2 hat brims from the each two different fabric, and 2 hat brim interfacing.  When I need to distinguish the fabrics for further explanation because of the two different fabrics used, I will call simply brown fabric, and white fabric to reduce confusion. Step 2 -  Place interfacing on wrong side of brim fabric and iron press on right side of fabric  the interfacing will be attached to fabric. Interfacing on only brown brim fabrics. Be noted that because the brim fabric is thick cotton I pressed right on it, but change heat level and place white cotton fabic between iron and the fabric if the fabric is senstive to heat, and recom