Posts

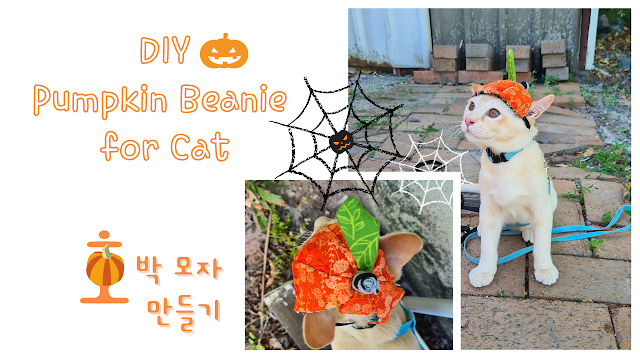
DIY Pumpkin Beanie for Cat; Pumpkin beanie for cat tutorial
Image
Halloween's on this Saturday (as cat mum I call Caturday)! and I made a Halloween pumpkin beanie for my dear kitty cat. Although expected that my cat would definitely hate wearing the beanie, I could not help! Because cats have very sensitive ears, I tried, made two holes in beanie which my cat ears would not folded and can be freely out through those holes.  He still not much a fan of the beanie I made :(  But soooo soooo CUTE! Happy Halloween everyone and stay safe from Covid 19. For tutorial, please click below video, hope you enjoy. Weekly videos upload, please subscribe my Youtube channel:  Mikinoos DIY Thank you.
DIY linen bag; Making eco bag tutorial from teatowels

Image
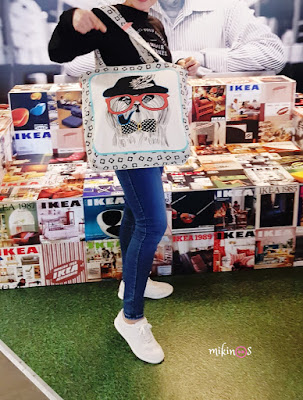
My friend bought two tea towels and she liked the patterns on tea towels so much, and she did not wanted to use them as tea towel. So making a linen bag from those two tea towels were decided.  Lookie Lookie the character above 🙃 a dog with pipe cigarette! How unique! With an environmental issue using plastic bags are discouraged, and recommended to use these linen bags. And much prettier and stronger than plastic bags👍 Two different towels used so either way you hold a bag would be so new!!  So easy to make, please click below video for tutorial, hope you enjoy. Weekly videos upload, please subscribe my Youtube channel: Mikinoos DIY Thank you. Youtube tutorial:  https://youtu.be/Ryuf_SBWge8

DIY cat toy - fish; cat toy tutorial

Image
Whoever has a cat would agree about cat toys, no matter how many you bought cat toys you want to get for your cat more and more!! I bought some, and I made one as well. When I make toys I should have inserted Catnips or bells in, oh well I forgot. This won't be not my last time for me to make cat toys, so I skipped alteration of putting them in, next time, I hope that I remember at least one of them😁 Please click below link for free tutorial on my Youtube channel: Mikinoos DIY Weekly videos uploaded, and would you please like and subscribe, which will be my motivation, thank you.              

DIY Pajamas with the patterns I made; Pajamas making tutorials

Image
             Last time I have uploaded tracing the patterns from my pajamas. Assuming you have watched the videos, today, I have the videos ready for making shorts & tops with the patterns I made.  Original pajama shorts waist band was very stylish which was very soft with color of sky blue. So hoping to get the waist band like that and went to the craft/dress shop, unfortunately there weren't many options I could buy, and I had a white one. I better search in Internet for next one. Finally, I have completed whole pajama set - with carrot and rabbit cotton fabrics. And perfect timing as it's Spring in here Australia, soon to be wear 😀 Please click below link for free tutorial on my Youtube channel: Minkinoos DIY . Weekly videos upload, and would you please like and subscribe, thank you.  video for pajama top:  https://youtu.be/Z-ekvwl7qdc video for pajama shorts:  https://youtu.be/JDc2uJtIVUg           ...

Copy patterns from your Pajamas; tutorial

Image
I copied the pajamas pattern from one of my favorite pajamas which worn a few years and a lot, and the pajamas got worn out, and had a few holes, and the elastic band on shorts also no longer and fabric discolored.. so I traced the pattern out of my pajamas before bin them. I believe you also have some favorite pajamas, in the instance, I hope my videos below would help you make them.  Please click the link below for free tutorials and enjoy. Weekly videos upload, please subscribe my Youtube channel "Mikinoos DIY" Thank you. for video of PJ top pattern:  https://youtu.be/jSH6PbgTTzw for video of PJ shorts pattern  https://youtu.be/8x9Ltj8m7qI Because the shorts are worn so much, left and right side might not exactly the same size any more, so I recommend you better fold them in half before tracing.  You would have noticed that I did not copy pattern as same as front top layer of my Pj's. As you see it's very wide around neck, and I don't think I ever opened any b...

DIY mini ironing board tutorial

Image
Laziness made me working on this little ironing board. Sewer would already feel or know that so many ironing needed while sewing.  Such as for straps, wrincle scrap fabrics, seam treat, bias fold, skirt heming, sleeves heming, heming,.. heming, .. endless hemings.. So not bother to turn my body for unfolding a big iron board, and taking out iron from cabinet, and uncoil iron... I highly recommend this mini ironing board, this make my sewing activity so easy. I sure use this little one a lot!!! No regret with this mini ironing board! Shall we make? Please click the link below for free tutorial and enjoy. Weekly videos upload, please subscribe my Youtube channel, thank you. https://youtu.be/nBpHcNN3_c0                          Easy, isn't it?!

DIY a Pincushion on Jar tutorial

Image
 Pincushion on Jar I have put a pincushion on jar, and decorated it with ribbons. Ribbons are not only making a bottle pretty but also covering jar lid and cardboard. Open the pincushion lid and buttons and beads can be stored in the jar. I use them most time when I sew, one of my fav pincushion 🥰🤩 How to: ♤ Make a round pincushion ♤ cut cardboard the same size as jar lid radious ♤ glue the pincushion to cardboard ♤ glue the pincushion & cardbard to jar lid ♤ glue your selection of ribbons to cover the cardboard and jar lid all around ♤ jar itself is too empty and boring, so glue a ribbon to jar For further information, please check it out on my youtube channel "Mikinoos DIY" or Please click the link below for free tutorial and enjoy. Weekly videos upload, please subscribe my Youtube channel, thank you. https://youtu.be/5W3VufHvQ8k

DIY foldable shopping bag tutorial

Image
DIY foldable shopping bag I have upcycled a broken umbrella, as some of you might know Oroton brand umbrella. And it was a very strong umbrella and i loved it. But someday in summer it was bucketing down and the strechers of umbrella was broken😭 and i was damn soaked. I have kept the umbrella fabic which was good choice, and it is used for foldable bag, Ta-Da. How to: ♤ cut fabric for front and bag panels the size you want ♤ make front pocket and sew to front panel ♤ right sides of front and back planels togethet and sew ♤ cut fabrics for bag handles and sew ♤ sew to bag panel For further details, please check it out below Youtube or find my youtube channel: Mikinoos DIY Please click the link below for free tutorial and enjoy. Weekly videos upload, please subscribe my Youtube channel, thank you. https://youtu.be/zcOdiMe5vXM